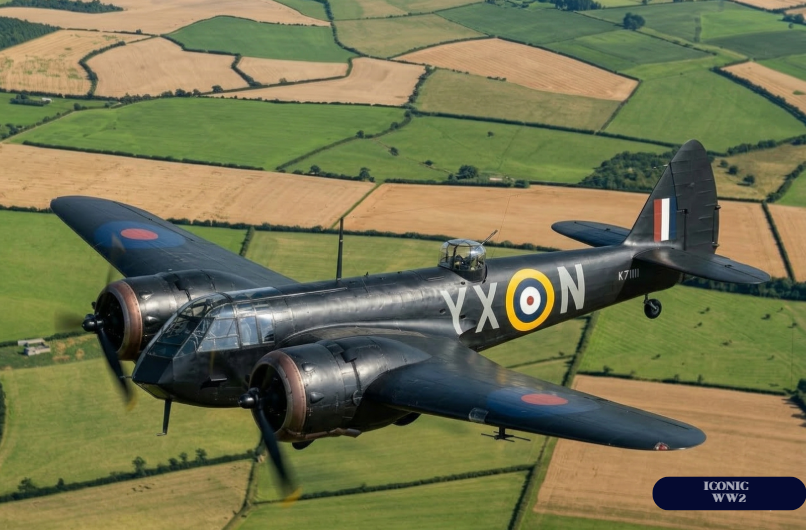
Bristol "Blenheim"
Developer: Bristol
Country: United Kingdom
First flight: 1938
Type: Light-Bomber/Torpedo Bomber
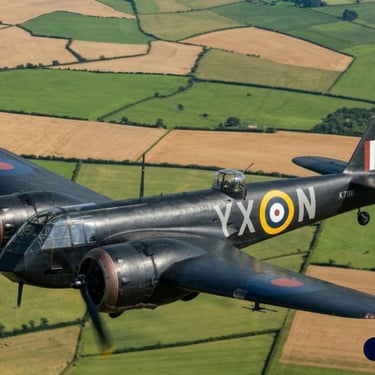
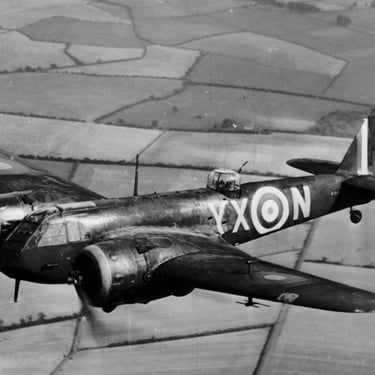
Bristol “Blenheim”
On September 3, 1939, at 11 a.m., the BBC broadcast British Prime Minister Neville Chamberlain's address to the nation declaring war on Nazi Germany. Half an hour earlier, a lone aircraft from No. 139 (Jamaica) Squadron took off from Weyton airfield in southeast England to conduct a photo reconnaissance mission over the main German naval base, Wilhelmshaven. This was the first combat sortie of the Royal Air Force in World War II. It was flown by Flight Lieutenant Mackerson (along with an observer and an air gunner) in a Bristol Blenheim Mk IV. The following day, Blenheims from Nos. 107, 110, and 139 Squadrons launched a raid on Wilhelmshaven—the first of many thousands conducted by the British over the next six years. The success of this raid against the Kriegsmarine was highly questionable, but the high losses suffered by the Blenheim squadrons were very real. Over the next two to three years, this pattern repeated itself with depressing regularity for the Blenheims. Whether used for high- or low-altitude bombing, from bases in England or the Mediterranean, success was achieved only at the cost of heavy losses to aircraft and their crews. A bitter lesson learned from these operations was that the Blenheim had become a victim of rapid technological progress. First flown in 1935, the Blenheim could outrun any biplane fighter with fixed landing gear in service at the time. In the four years between the aircraft's development and the outbreak of hostilities, high-speed monoplane fighters emerged. The Blenheim could no longer avoid or adequately counter the Bf 109 and Bf 110—the Luftwaffe's newest fighters. Furthermore, the increased weight resulting from the installation of gun emplacements, radios, and bombing equipment resulted in a deterioration in performance that even more powerful engines couldn't remedy. The insufficient number of these aircraft built before the war gave rise to the phrase "too few, too late" in Britain, which became increasingly common as hostilities escalated. A similar situation developed in the Far East, where Blenheim units were literally wiped out by Japanese fighters, particularly the Mitsubishi A6M Zero. In the initial stages of the fighting in the Middle East, the Blenheim played a vital role, as it was the only modern bomber the Royal Air Force had in service there.
The Blenheim wasn't the only victim of the overconfidence of British aviation officials. By the mid-1930s, air combat technology and tactics had barely advanced from those used during the First World War. Most RAF aircraft were biplanes, and the speed and firepower achieved by monoplane fighters were therefore unattainable. Ironically, the first monoplane designs to emerge in the 1930s were multi-engine bombers, not single-engine fighters. Therefore, when the Blenheim first took to the air, its performance was compared primarily to the two primary fighters in the RAF's inventory at the time—the Hawker Fury and Gloster Gladiator biplanes. These peculiar "comparative tests" led to the erroneous and very dangerous conclusion that the Blenheim would be able to easily evade fighter interception. It's worth noting that the British weren't the only victims of such erroneous thinking. German bombers like the Dornier Do 17 and Heinkel He 111 performed well during the Spanish Civil War, where their opponents were predominantly biplane fighters. This success turned the heads of the Luftwaffe, which overlooked the need to strengthen the bombers' defensive armament, believing they could easily evade fighters. Furthermore, the belief that "high-speed" bombers didn't need fighter escort became ingrained. These misconceptions cost the Germans dearly during the Battle of Britain. The Blenheim was not originally conceived as a bomber and was developed without any RAF input. In early 1933, Frank Barnwell, chief designer of the Bristol company, proposed building a light, high-speed passenger aircraft, the Bristol Type 135. The aircraft was an all-metal, low-wing monoplane with a flexible skin, capable of accommodating eight passengers. It was to be powered by two nine-cylinder, air-cooled Bristol Aquila I engines, each producing 500 hp. A fuselage mockup was built in 1934 and was slated for display at the 1935 Paris Air Show.
At this time, Lord Rothermere, owner of the Daily Mail newspaper, expressed interest in the project, as he intended to establish a high-speed airline network between major European cities, serving business travelers. The Type 135, with its small capacity and high speed, seemed ideal for this purpose. The Type 135 was expected to achieve a top speed of 290 km/h (180 mph), but its range did not meet the newspaper magnate's requirements. Therefore, modifications had to be made to the aircraft's design: the fuselage cross-section was reduced slightly to reduce drag, and Bristol Mercury VI air-cooled engines producing 640 hp each were proposed in place of the Aquila I engines. Work on the project, designated Bristol Type 142, began in April 1934. Lord Rothermere covered the bulk of the costs. Bristol, having learned of the government's plans to expand the Air Force, began privately developing a military version of the aircraft, designated the Type 143. The prototype, the Type 142, powered by two 640-hp Mercury VI air-cooled engines driving four-bladed fixed-pitch propellers, first flew on April 12, 1935. The main landing gear retracted rearward into the engine nacelles and was protected by forward-mounted doors. The wedge-shaped nose with Plexiglas panels provided the pilot with excellent forward and downward visibility. The low-wing was equipped with large landing flaps, reducing takeoff and landing distances.
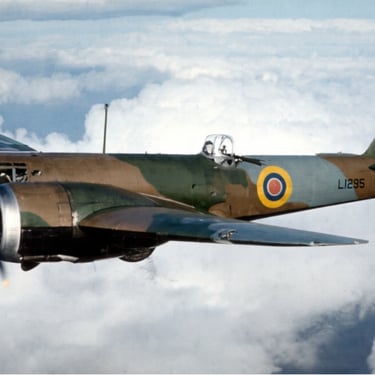
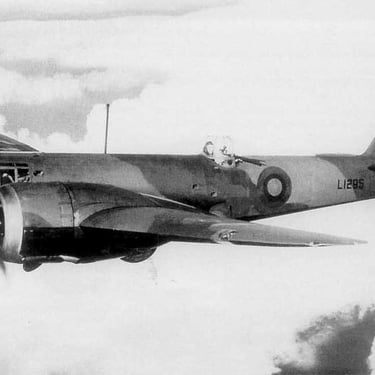
The aircraft's performance proved to be significantly superior to expectations, with a top speed of 482 km/h (300 mph). It is believed that it was this performance that prompted the Air Ministry to approach Lord Rothermere with a request to "loan" the Type 142 prototype for RAF testing. In response, the lord donated the aircraft to the army aviators. The aircraft was assigned the civil registration code G-ADCZ, which, however, was never painted on the aircraft's side. However, the name Lord Rothermere bestowed upon it—"Britain First"—became more famous. When the aircraft arrived at RAF Martlesham Heath experimental airfield in June 1935, it bore the designation R-12. This was replaced in July by the military registration number K7557, painted on the fuselage and rudder. The civil designation G-ADCZ was officially abandoned in October 1935. Flight tests at Martlesham Heath showed that the aircraft could reach a maximum speed of 280 mph (458 km/h) with a maximum load, and a maximum speed of 305 mph (494 km/h) when empty. Bristol was now in talks with the Air Ministry about converting the Type 142 into a bomber. In August 1935, the Air Ministry issued specification B.28/35 for a three-seat bomber, which Bristol assigned the designation Type 142M. In September of that year, the first order was placed for 150 aircraft for the Royal Air Force, designated Blenheim Mk I.
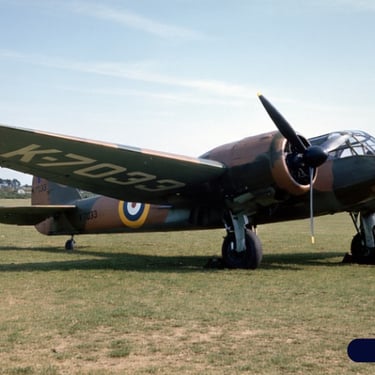
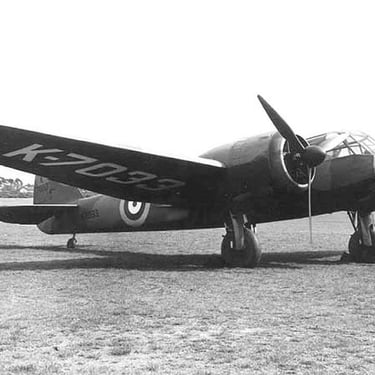
To transform the Type 142 into a bomber, it was converted from a low-wing monoplane to a mid-wing monoplane, allowing for a bomb bay to be incorporated into the fuselage. The pilot and navigator/bombardier were accommodated in a redesigned, widened nose. The bombardier's station was located in the nose, on the starboard side. Additional glazing was installed on the underside of the nose. The aircraft's defensive armament consisted of a single dorsal turret, mounted on the fuselage fairing near the trailing edge of the wing. This turret, designed by Bristol, was armed with a 7.69mm Lewis machine gun, later replaced by a Vickers K of the same caliber. A second 7.69mm Browning machine gun was fixed in the left wing root, and was fired by the pilot. This weak armament reflected the opinion of air force officials, who believed that bombers would rarely, if ever, engage fighters. These views were not swayed even by the emergence of the new British monoplane fighters, the Supermarine Spitfire and Hawker Hurricane, already in prototype form, or by reports of the new German Messerschmitt Bf-109 fighter. Other design changes to the Type 142M included a longer-span horizontal stabilizer, the fuselage attachment point of which was raised slightly compared to its predecessor, and a retractable tail landing gear (the Britain First's tailwheel did not retract, but was covered by a teardrop-shaped fairing). The airframe was strengthened to withstand the increased loads from bombs and other military equipment. The first production Blenheim Mk 1 (K7033) was used to further refine the aircraft. It was transferred to the RAF Martlesham Test Centre in June 1936. This aircraft was equipped with Mercury VI-S2 engines driving three-bladed DeHavilland-Hamilton variable-pitch propellers. For a brief period during the testing program, the propellers were equipped with spinners, but when it was discovered that they had no effect on flight performance, their use was abandoned. The bomber's maiden flight took place on June 25, 1936, and as a result of these test flights, the decision was made to replace the Mercury VI-S2 engines on production aircraft with Mercury VIII engines producing 850 hp and to install controllable cooling system doors on the engine nacelles. The maximum weight of the Blenheim Mk I was 4,989 kg, which was 907 kg more than the Type 142, and its maximum speed was 452 km/h (288 mph) – only 41 km/h (25 mph) less than the Britain First.
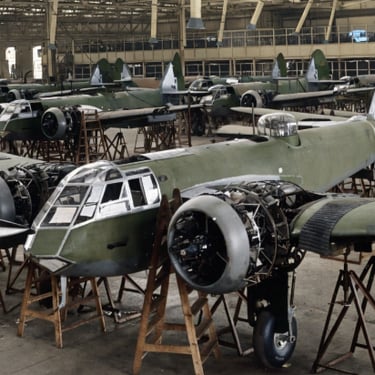
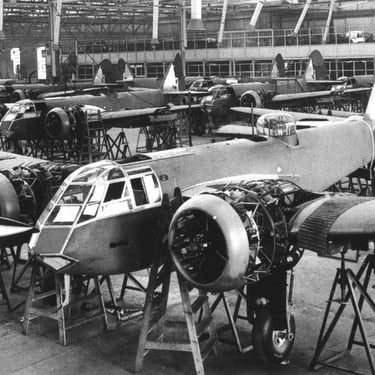
Flight testing concluded in December 1936, and based on their results, the Royal Air Force gave the go-ahead for full-scale production of the Blenheim Mk I and awarded Bristol an additional contract for 434 aircraft. Furthermore, the company was granted the right to enter into contracts for the supply of new aircraft to governments friendly to Great Britain. Foreign sales of the aircraft were permitted after the company had fulfilled orders from the Royal Air Force. The design of the fifth production aircraft incorporated all the improvements and modifications made during testing of its four predecessors. The Blenheim Mk I, which became the benchmark for the series, was equipped with 850 hp Mercury VHI engines with adjustable cooling system flaps, and the retractable tailwheel was replaced with a fixed one. The first deliveries of production Blenheim Mk I to RAF squadrons began in March 1937. The lead aircraft (K7036) "drove" to the other end of the runway at the factory airfield in Wyton, which was also home to 114 Squadron. The combination of the grass runway, an inexperienced pilot, and jammed brakes resulted in the aircraft flipping over onto its back and being completely destroyed. Despite this incident, 114 Squadron was fully re-equipped with Blenheim Mk I aircraft by the summer of 1937. By the end of that year, four more squadrons
The RAF – the 45th, 90th, 139th, and 144th – were equipped entirely with Blenheim Mk I aircraft. In accordance with the RAF expansion plans, twelve more squadrons, including several newly formed ones, were to be equipped with Blenheim Mk I aircraft during 1938. Numerous tests conducted by the RAF with production aircraft confirmed that their performance characteristics matched those of the prototype, including speed, bomb load (453 kg), and range (1,810 miles).
Blenheims operated by Bomber Command had a crew of three: a pilot, a navigator/bombardier, and a gunner. The pilot sat on the left side of the cockpit. Directly in front of him was one instrument panel, and a second one to his left. The compass was located in the lower left part of the panel, next to it was a console with engine controls and propeller pitch controls. Also located on the left side of the cockpit floor were the hydraulic system controls. This layout often led to accidents when pilots confused the controls.
Access to the cockpit was through a large sliding hatch in the upper fuselage, located above the pilot's station. The navigator's folding seat was located on the port side, next to the pilot's seat, and was used only during takeoff and landing. The gunner entered the aircraft through a hatch in the fuselage fairing, located forward of the Bristol Mk I (or Mk II) dorsal turret. Interestingly, gunners were not part of the flight crew until 1940, and unlike the pilot and navigator, they also performed routine ground duties. The semi-retractable turret, armed with a single 7.69 mm Lewis gun, could be extended upward to increase the field of fire or lowered to reduce drag. The transition from biplane bombers with fixed landing gear and fixed-pitch propellers to Blenheims with their retractable landing gear, variable-pitch propellers, and flaps caused a number of problems in squadrons. Numerous levers, often poorly positioned, caused pilots to become confused, which often led to accidents and disasters. For example, the landing gear and flap controls were located too close together; retracting the flaps instead of the landing gear during takeoff resulted in stalls, sometimes with fatal consequences. Incorrect propeller pitch settings during takeoff typically resulted in the bomber rolling off the runway before it even took off.
From March 1937 to August 1939, sixteen squadrons of Bomber Command were equipped with Blenheim Mk I bombers. These squadrons were part of 1, 2, and 5 Groups. Between March 1938 and May 1939, at least seven squadrons were transferred to airfields in Norfolk and Suffolk, where they formed the backbone of 2 Group. 5 Group remained in Lincolnshire, but three of its four Blenheim squadrons were converted to Hampden bombers between February and May 1939. A fourth squadron (62 Squadron) was sent to Singapore immediately after the outbreak of war. By the time war was declared, only 104 and 108 Squadrons were equipped with Blenheim Mk I aircraft, and both were used by 6 Group for training and practice. 18 Squadron operated Blenheims briefly, but during this period it also performed training tasks for 6 Group. In accordance with the "shadow production" concept, Blenheim production was carried out by three companies. "Shadow production" offered two key advantages: first, it freed up the aircraft manufacturer's production capacity, allowing it to focus on further development of the aircraft; second, it prevented the enemy from "completing" production of an aircraft type with a single successful air strike. Even if enemy bombers managed to disable one factory, other manufacturers would continue to supply aircraft and spare parts. Unlike later variants, the majority of Blenheim Mk I bombers were built by Bristol itself. Around 650 aircraft were produced for the Royal Air Force, with another 44 exported (twelve to Finland, 30 to Turkey, and two to Yugoslavia). The two bombers delivered to Yugoslavia became the standard for 48 Blenheims built under license by the Ikarus factory in Belgrade. These aircraft, along with 22 aircraft purchased from England, were in service with the Yugoslav Air Force by the time of the Nazi invasion in April 1941. During the brief campaign, three Blenheim squadrons of the Yugoslav Air Force carried out intensive attacks on both enemy troop columns and targets in Austria and Hungary. They suffered extremely high losses in the air and on the ground, and after the capitulation of the Yugoslav government, the surviving aircraft were handed over to the pro-German Croatian Air Force.
In April 1938, Finland purchased a license to manufacture Blenheims and Mercury engines, which were produced at the State Aircraft Factory in Tampere. Finnish Blenheims featured an extended-width bomb bay, capable of accommodating American and Swedish bombs, which had a larger diameter than their British counterparts. Many Finnish Mk Is were equipped with ski landing gear, allowing them to operate from snow-covered airfields. Between 1941 and 1944, a total of fifty-five Blenheims were built in Finland. These included aircraft supplied by Britain, both newly built by Bristol and from the RAF Reserve. These bombers also featured an extended bomb bay. A.V. Rowe & Company Limited manufactured 250 Blenheims under cover of "shadow" production. Ten of these machines were delivered to Finland, thirteen to Romania, and twenty-two to Yugoslavia. AVRO produced Blenheims until March 1940. The third Blenheim manufacturer was Rute Securities Limited in Speke. It produced a total of 318 airframes, 250 of which left the assembly lines as Blenheim Mk I. Like other companies, Rute exported many aircraft abroad—two to Greece and twenty-two to Romania. Sixty-eight airframes were later converted into Blenheim Mk IV Ls. Rute ended bomber production before the outbreak of World War II.
To meet the Royal Air Force's requirements for various aircraft types, Bristol modified the Blenheim Mk I several times. One such modification was a photo-reconnaissance aircraft, designated the Blenheim PR Mk 1. One production bomber, the L 1348, was also modified as a prototype. The wingspan was reduced by 0.91 m, with straight wingtips. The turret was removed and its mounting position was covered with a fairing, and the nose glazing area was reduced. Furthermore, to increase speed, the aircraft was painted Sky Blue and polished instead of its usual camouflage. Tests showed that at medium altitudes, the aircraft could reach a speed of 476 km/h (290 mph) – faster than the standard Mk I, but insufficient for a high-speed photo-reconnaissance aircraft. Therefore, further development of this modification was abandoned. Bristol investigated options for increasing the bomber's range and payload and modified one aircraft, the L 1222, which became the prototype for the then-developed Blenheim Mk II. The wing design was modified to accommodate additional fuel tanks in the outer wings. Additionally, hardpoints for 113-kg (250 lb) bombs were installed under the wing, between the fuselage and engine nacelles. Due to the increased weight, the landing gear had to be reinforced. Tests showed that the maximum speed dropped to 380 km/h (240 mph), making the aircraft even more vulnerable to fighters. Further work on the Mk II was discontinued. The combat use of the RAF Blenheim Mk I was largely limited to overseas theaters of war, such as the Middle and Far East. When Italy declared war on England, five Blenheim squadrons were stationed in Egypt, three in Aden on the Red Sea, and one in Iraq. Immediately after the declaration of war, bomber raids began against Italian forces in North and East Africa (in the latter region, the enemy outnumbered the British ten to one), but they remained sporadic until the end of 1940. In December 1940, the British launched a surprise offensive against the Italians and, within weeks, drove them back into Cyrenaica. Blenheim and Wellington bomber squadrons played an active role in this offensive, bombing enemy troop camps, Taku, and important fortified points such as Tobruk and Benghazi. Four Blenheim squadrons—11, 30, 84, and 113—deployed to Greece in October 1940 were reinforced by 211 Squadron in March 1941. These units operated in extremely difficult conditions and were unable to carry out effective raids. The situation in Greece changed dramatically in April 1941, when the German Wehrmacht invaded the country. Heavy air losses were now compounded by intensive raids on British airfields. At the end of April, Royal Air Force units retreated to Crete, from where their personnel and surviving aircraft (with the exception of No. 30 Squadron) were withdrawn to Egypt.The remaining 30th Squadron on Crete was completely destroyed during the German invasion of the island in May 1941. In North Africa, the German Afrika Korps (DAK) under General Erwin Rommel came to the aid of the Italians. A few days after their arrival, the Germans launched a counteroffensive, forcing the British 8th Army to retreat to Egypt. The Blenheims attempted to strike the advancing German forces, but were now confronted by the Luftwaffe's Messerschmitt Bf 109E fighters, which inflicted heavy losses on the outdated bombers.
Blenheim units operating against the Italians in East Africa, where Luftwaffe fighters were unavailable, were far more successful. Bombers from Nos. 8, 11, and 39 Squadrons helped halt the Italian advance from June to December 1940, and when the British counterattacked, these units provided direct support for their own troops. During the fighting, No. 11 Squadron was withdrawn to the rear to re-equip with Blenheim Mk IVs, while No. 39 Squadron was equipped with Martin Maryland bombers. By May 1941, when the Italians surrendered, No. 8 Squadron was the only RAF unit in East Africa equipped with Blenheim Mk I bombers. During the initial stages of hostilities in North Africa and the Middle East, the Blenheim Mk I was the only modern bomber available to the RAF. Only in mid-1941 did the British begin replacing it with more modern aircraft—the Vickers Wellington, Martin Maryland, and Martin Baltimore. When the war in the Far East began on December 8, 1941, the RAF had two Blenheim squadrons in Malaya, Nos. 34 and 62, and one, No. 60, in Burma. But by the start of hostilities, most of No. 60 Squadron's twelve Blenheim Mk I bombers were in Kuantan, Malaya, training, and only a few remained in Burma. Most of the Blenheims in the Far East never saw combat, having been destroyed at airfields in northern Malaya on the first day of fighting. A surprise Japanese raid on Elor Star resulted in the loss of eleven of No. 60 Squadron's twelve Blenheims. The sole surviving bomber, piloted by Flight Lieutenant A.S.K. Scruff, took off and attacked Japanese landing craft near Singora. Scruff was mortally wounded during this raid. After the war, he was posthumously awarded the Victoria Cross. In late December 1941, the surviving personnel of No. 60 Squadron returned to Burma. The Japanese were advancing, and the surviving aircraft of No. 34 Squadron desperately tried to impede their advance, attacking enemy troop columns and lines of communication, suffering heavy losses from Japanese fighters. In January 1942, No. 225 (Bomber) Group was formed in Sumatra from aircraft that had survived in Malaya and those brought back from the Middle East, but by the Battle of Malaya, the Blenheim Mk I had almost completely been withdrawn from service. The Japanese offensive into Burma began on December 25, 1941, with several air raids on Rangoon. No. 60 Squadron, operating alongside the newly arrived No. 211 Squadron, responded by attacking a Japanese airbase in Bangkok, Thailand. The lack of replacement aircraft and the need to withdraw No. 211 Squadron to the rear for reorganization forced the RAF to reduce the intensity of its bomber operations. By March 1942, No. 45 Squadron had arrived in Burma from the Middle East and began operating from Magwe Airfield.As part of "X" Wing (now known as "Burwing"), the squadron, escorted by ten Hawker Hurricane fighters, attacked the Japanese airbase at Mingaldon. The enemy response was swift and devastating—more than 200 bombers dropped their payloads on Magwe, destroying most of the Blenheims on the ground. After the Burma campaign, the Blenheim Mk I virtually disappeared from combat units. A small number of these aircraft remained in training squadrons and reserve units, while later variants of the Blenheim began to enter service, as well as new bombers such as the Bristol Beaufort, Douglas Boston, Martin Maryland, and other aircraft supplied by the Americans under Lend-Lease.
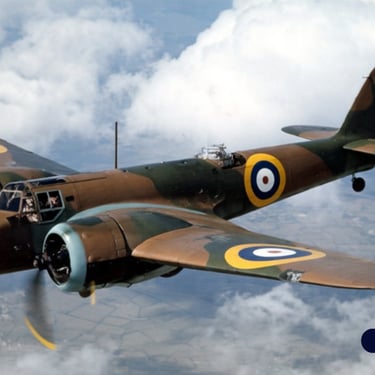
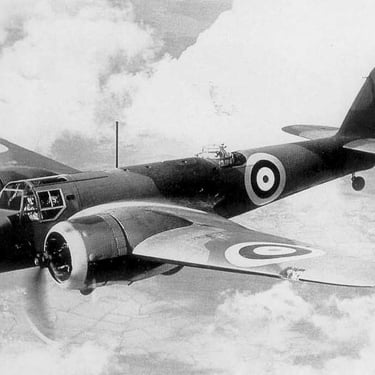
The Blenheim Mk IV was not, as many mistakenly believe, a further development of the Blenheim Mk 1. Its predecessor was the Bristol Type 149, developed based on Air Ministry Specification 11/36, which called for a reconnaissance bomber for Coastal Command. This aircraft was seen as a transitional type between the aging Avro Anson and the Bristol Type 152 torpedo bomber (later known as the Bristol Beaufort). At the time the specification was issued, the RAF had not yet considered purchasing the American Lockheed Hudson. This decision was made in 1939, and the Beaufort was showing good results in testing. Therefore, the Type 149 was transferred to Bomber Command under the designation Bolingbroke. In October 1939, a mockup of the Bristol Type 149 was built, featuring the elongated forward fuselage (though not in its final form), which later became the main distinguishing feature of the Blenheim Mk IV. The fuselage was extended by 0.91 m (3 ft 1 in) due to the addition of the cockpit canopy. S.F. Uwins, the Bristol Chief Pilot, who examined the mockup, stated that the glass area extending in front of the pilot created glare and reflections, making normal piloting impossible. The navigator/bombardier's station was equipped with a table mounted on the port side (a luxury unavailable on the Blenheim Mk I), and a bombsight was located on the starboard side. In response to the chief pilot's wishes, the canopy above the navigator's station was lowered, and the pilot received a conventional windscreen. To improve the pilot's visibility, the navigator's canopy, originally semicircular in cross-section, was recessed downwards along the port side. The development of the Type 149, like the Beaufort, was plagued by delays related to the selection of a suitable engine. Therefore, in mid-1938, the British government began considering purchasing Hudsocks from America, which later proved themselves to be highly successful in Coastal Command service.
A modified Blenheim Mk 1 (K 7072) airframe served as the Type 149 prototype. Another Mk I, L1222, was used to test the new aircraft's fuel system, which was increased in capacity by installing 355-liter fuel tanks in both outer wing panels. This solution nearly doubled the aircraft's range. The Mk I's 840 hp Mercury VIII engines were replaced with 995 hp Mercury XV air-cooled engines driving three-bladed DeHavilland variable-pitch propellers. These modifications increased the aircraft's maximum takeoff weight to 6,577–6,800 kg (14,500–15,500 lb), which created problems during takeoff. At maximum weight, the aircraft could stall if its engines failed, making an emergency landing virtually impossible. To solve this problem, the external fuel tanks were equipped with drain pipes located near the wing trailing edge. In the event of an aborted takeoff, these drain pipes allowed for rapid fuel dumping, bringing the aircraft's weight within acceptable limits. By mid-1939, all modifications were completed, and preparations for production began. Bristol intended to begin production immediately, without interrupting Blenheim Mk I production. The RAF placed an order for the Type 149, designated the Blenheim Mk IV (the "Bolingbroke" name was dropped, but not forgotten). RAF squadrons' demand for the new bombers was so great that many of the first batches of Mk IVs built at Filton were sent to units without the external wing fuel tanks installed. These tanks were later installed by Bristol specialists, working with RAF personnel, directly in the field. Many Mk IVs left the assembly lines with Mercury VII engines, instead of the planned Mercury XVs. Test results showed the Mk IV's top speed to be 225 mph (363 km/h), which was faster than the Mk I. However, this data is misleading, as the measurements were taken at an altitude of 12,500 ft (3,600 m), while the Mk I's performance was measured at sea level, where it reached 245 mph (386 km/h). Clearly, at the same altitude as the Mk IV, the "one" would have been slightly faster. Unfortunately, this was confirmed in combat, when it became clear that the Blenheim Mk IV was no better than the Mk I when encountering Luftwaffe fighters. It became clear that the Blenheims needed fighter cover. When this was impossible, daylight flights were limited to days "...when cloud cover provides adequate safety." Flights were not carried out if cloud cover was less than 7/10.
The Blenheim Mk1V's range increased to 2,350 km compared to 1,810 km for the Mk I, but due to its increased weight, the bomber's ceiling dropped from 8,230 to 6,700 m. The standard bomb load consisted of four 113 kg or two 226 kg bombs in the bomb bay. Another problem was the aircraft's propellers. Although they had variable pitch, they could not be feathered. Therefore, if one engine failed, its propeller would spin in the oncoming airflow, creating additional drag and making the aircraft difficult to control. Unlike the Mk I, most Mk IVs were built by Roote & Spike and AVRO in Chadderton. Bristol limited production to 313 bombers, twelve of which were purchased by the Hellenic Air Force. Aircraft deliveries began in February 1939, and one of the first Bristol-built aircraft, L 4835, was transferred to the Aeroplane and Armament Experimental Establishment (A&A.EE) for testing a new antenna. Two more aircraft, L 4847 and 4857, were used as testbeds for design solutions later used on the production Mk IV. Specifically, they tested the dorsal turret with two machine guns and the remote-controlled turret mounted under the nose of the fuselage. Six aircraft were modified by installing a pod containing four 7.69 mm Browning machine guns under the fuselage and transferred to 248 Squadron, Coastal Command, for use as patrol and long-range escort fighters. The proposed modification of four Mk IVs (P 4856-4859) into the Canadian version of the Bolingbrook was abandoned, and the first armoured upper turret was tested on P 6952.
AVRO built a total of 755 aircraft, although the original contract specified a much higher number – during the production of the Mk IV at AVRO, the Air Ministry rejected two batches. Two aircraft, 3544 and 3600, were ultimately delivered to Portugal in 1943, and the final batch of five aircraft (AE 449-453) went straight from the factory to a storage base in late 1941. Twenty-two AVRO-built bombers were transferred to the Free French Air Force. The main supplier of Blenheim Mk IVs was Rute Limited, which built 2,230 aircraft in six series. Four aircraft (R 3623, R 3830, T 2431, and T 2434) were sold to Portugal, and one (T 1996) was received by Turkey. The aircraft were used by the Royal Air Force and underwent modifications right on the production line, primarily involving the installation of various nose and dorsal turret options. Ten aircraft received additional armor and were transferred to 248 Squadron, Coastal Command, where they were used for anti-submarine missions. The only foreign manufacturer of Blenheim Mk IVs was Finland. The Finnish Air Force had already successfully used Blenheim Mk I bombers during the Winter War with the USSR in 1939/40 and the Continuation War of 1941/44. Production of the Mk IV began in early 1944, with ten of the planned fifty aircraft completed by September. During the entire period of Blenheim service, Finland lost 49 aircraft – 29 in combat, the rest in accidents and crashes. The surviving bombers were used as training aircraft until 1957, when they were withdrawn from service. At least one Blenheim Mk IV survives in Finland to this day, and is on public display at Lyoonetjärvi Air Base.
In the autumn of 1939, units of the Royal Air Force and the Royal Air Force were deployed to France. The Royal Air Force consisted of two separate elements: the Advanced Air Striking Force (AASF) and the Air Component (AC). The AASF units were tasked with attacking industrial targets in Germany, while the AC was tasked with providing close support to the British Expeditionary Force (BEF). When the ten squadrons that made up the AASF deployed to France, they were armed only with the single-engine Fairey Battle light bomber. By the end of 1939, Nos. 15 and 40 Squadrons had returned to England to re-equip with the Blenheim Mk IV. In France, these units were replaced by Nos. 114 and 139 Squadrons, now equipped with the Mk IV. Two AC squadrons, 53 and 59, initially flew Blenheim Mk IVs, and were soon joined by 18 and 57 Squadrons, which flew Mk I bombers. The latter quickly traded in their I-1s for B-4s, as the British had no other modern bombers. While the Blenheims based in France rarely saw combat during the first eight months of hostilities (now known as the Phoney War), Bomber Command squadrons in the UK began active operations almost immediately. Ten Blenheim Mk IVs from 107 Squadron, based at Shilling Rode, were sent to attack Kriegsmarine ships in Wilhelmshaven. Low cloud cover in the target area allowed the British to approach the enemy undetected; they were discovered only after the bombers had already set their attack course. Unfortunately, the 500-pound bombs carried by the British aircraft failed to cause significant damage to the German ships. One Blenheim, which crashed into the cruiser Emden, caused significant damage. A total of eight aircraft did not return from this operation—all fell victim to anti-aircraft fire. Most of the British Blenheim Mk IV squadrons were part of 2 Group, Bomber Command, operating from airfields in East Anglia. From September 1939 to April 1940, these units conducted anti-submarine operations off the northwest coast of Germany. The success of these operations was extremely low, but on March 11, 1940, two bombs dropped from a Blenheim of No. 82 Squadron sank the submarine U-31, becoming the first submarine destroyed by the Royal Air Force in World War II. Following the German invasion of Denmark and Norway in April 1940, some aircraft from No. 107 and No. 110 Squadrons were transferred to Lossiemouth, Scotland. These bombers were tasked with intercepting and attacking German ships en route to Norwegian ports. The effectiveness of these operations was zero – despite British claims, the Germans did not lose a single ship. With the Germans firmly entrenched in Norway, the Blenheims were tasked with attacking enemy-held airfields along the coast.In this case, interception of attacking bombers by Luftwaffe fighters became virtually inevitable, and Blenheim crews insisted that such actions would lead to unnecessary losses. In May, the Allied position in Scandinavia became virtually hopeless, and the bombers returned to their base at Wittisham to prepare for the expected German spring offensive. On May 10, 1940, the Germans launched their main offensive through Holland, and within days, a serious threat loomed over the British Expeditionary Force in Belgium. British troops occupied forward positions in accordance with the Allied defense plan, but a second German attack through the weakly defended Ardennes region cut across the British and French forces. The British forces risked encirclement and were forced to retreat, evacuating through the ports of Dunkirk and Calais.
Of the AASF Blenheim-equipped units, the worst hit were 114 Squadron, which lost most of its aircraft on the ground in a surprise attack by nine Do 17Z bombers from II/KG2, and 139 Squadron, which lost seven of its nine aircraft to Bf 109Es from JG 27 on 12 May. Five Blenheim units of the AF suffered a similar fate. On 12 May, 15 Squadron lost six of its twelve aircraft, on 14 May, 85 Squadron lost eleven of its twelve Blenheims that took part in the raid, and, on the same day, five of 110 Squadron's twelve bombers were shot down while attempting to attack German forces near Sedan. It became clear that the Blenheim's defensive armament was completely inadequate, and even the barrage of an entire group of these aircraft could not prevent enemy fighter attacks. The few Allied fighter squadrons were scattered across the entire front, and even when cover was successfully organized, the enemy "broke through" it due to its numerical superiority. The medium altitudes from which bombing was conducted made the Blenheims an attractive target for German anti-aircraft gunners, and many aircraft fell victim to their fire. The Blenheim's insufficient defensive armament prompted numerous field modifications aimed at enhancing it. Wing Commander Basil Embry, commander of 107 Squadron at Wittishen, ordered modifications to some Blenheims, installing 7.69mm machine guns in the rear of the engine nacelles and under the tailplane. A more "official" modification involved installing a light machine gun in the nose, which could be fired by the navigator. Bristol knew that the Lewis gun in the dorsal turret alone was insufficient and experimented with a turret armed with a pair of 7.69mm Vickers machine guns. After the Battle of France, Blackheims began to be equipped with twin-barreled Bristol B MIN turrets, and the last production Mk IVs received the Bristol B Mk IV turret, armed with a pair of belt-fed Browning machine guns. To protect the aircraft from below, Bristol developed a ventral turret consisting of a 7.69mm machine gun enclosed in a transparent teardrop-shaped fairing. Later, an angular Fraser-Nash FN54 turret with a pair of 7.69mm Browning machine guns was used, mounted ventral to the starboard side of the forward fuselage. In an emergency, the turret could be jettisoned to allow the crew to use the lower escape hatch. At the start of combat, Blenheims had neither designed fuel tanks nor armor protection for the crew. Many Blenheims burned after fuel tank damage, until they were retrofitted with protective armor in early 1940. Initially, due to material shortages, only the main tanks were protected, leaving the outer wing tanks unprotected.
Another modification made following combat operations was the installation of a rearview mirror on the canopy frame. Furthermore, to improve rearward visibility, the canopy's side windows were made in blisters.
Beginning in January 1941, the RAF adopted a new tactic: Blenheims were sent to targets in France under heavy fighter cover. These operations were dubbed "Circus" (and given a sequential number). The first "Circus" was conducted on January 10, 1941, by No. 114 Squadron, which, accompanied by nine (!) fighter escort squadrons, attacked a German airfield. It was believed that such attacks would force Luftwaffe fighters to scramble to attack the decoy bombers, where they would be intercepted and destroyed by British fighter escorts. However, the Germans soon saw through this tactic, and instead attempted to attack the bombers on their return or from ambush, rather than engaging the fighters. Nevertheless, "Circus" operations allowed the British to nearly double the losses inflicted on the Luftwaffe. The attack on the USSR in June 1941 gave them additional incentive to continue to pressure the Luftwaffe, believing this would divert some German air power from the Eastern Front. In reality, the only fighter squadron, JG 26, opposing the RAF in France not only successfully countered their flights but even sent its units on "tours" to the Mediterranean theater. During one of the August "Circus" raids, Blenheims carried out the only "peaceful bombing" mission ever performed – they dropped new prosthetic limbs for Douglas Bader, a legless RAF fighter ace who had been shot down and captured a few days earlier. In April 1941, the RAF attempted to interdict a convoy in the Straits of Dover during daylight. This operation, dubbed "Channel Stop," was a localized version of a larger anti-shipping operation that had been underway along the entire North Sea coast since March. Such operations were typically carried out by Coastal Command, but at the time, it was preoccupied with combating the "wolf packs" of German U-boats in the Atlantic. Therefore, the task was assigned to Bomber Command's 2nd Group. The plan was to conduct sorties against the coastal waters of Holland, Denmark, and Norway. The aircraft were to fly at low altitude to avoid premature detection by convoy air defenses and patrolling fighters. The risky low-altitude flights, the increased number of anti-aircraft ships in German convoys, and the Luftwaffe's ability to organize continuous fighter cover resulted in heavy losses among the Blenheim units. Operation "Channel Stop" was completed in early 1942. A subsequent study of the list of sunken ships revealed that the actual German losses amounted to a quarter of those claimed by the British. The experience gained during the operation allowed the British to later form anti-ship strike wings. These units were equipped with Beaufighters and Mosquitoes armed with torpedoes and missiles, the power of which allowed them to destroy all anti-aircraft ships before attacking the convoy.Blenheims of 2 Group were also used to strike Germany. On July 4, 1941, twelve Blenheim Mk IVs, led by Wing Commander Edwards, commander of 105 Squadron, bombed the port of Bremen. Despite strong resistance, the bombers hit targets on the coast, losing four aircraft. For this mission, Edwards was awarded the Victoria Cross. On August 12, a formation of 54 Blenheims, flying over 200 miles over enemy territory, attacked two power stations near Cologne from low altitude. British fighter escorts carried out a series of diversionary attacks to prevent the Luftwaffe from detecting the low-flying bombers. The 500-pound bombs carried by the Blenheims inflicted moderate damage on their targets, and the British lost ten aircraft. The arrival of more modern twin-engine aircraft, such as the American Douglas Boston bomber, by December 1941 allowed Bomber Command to abandon the use of Blenheim Mk IVs in the skies over occupied Europe. These aircraft and their crews had enabled the Royal Air Force to conduct offensive operations in Europe for two years of war, but they were replaced by modern aircraft capable of more effectively engaging the enemy. Of the nine Blenheim squadrons in the Middle East, only 113th Squadron in Aden had received the new Mk IVs by the time Italy entered the war on June 10, 1940. However, by the end of the year, about a hundred Blenheim Mk IVs had arrived from England, destined for the rearmament of RAF units in the Middle East. The aircraft were shipped to Takoradi in West Africa, where they were assembled and then flown the approximately 4,000 miles to Egypt. This route was used to avoid bomber flights over the Mediterranean, where the enemy had gained air superiority. Blenheim MkIVs were first used in combat in North Africa by Nos. 45 and 55 Squadrons, although there is evidence that a number of Blenheims remained with No. 11 Squadron in Greece until the Allied evacuation. No. 203 Squadron, based at Habbaniyah, Iraq, used Mk IVs to suppress the pro-German Rashid Ali rebellion in April 1941 and also attacked Vichy forces in Syria until their surrender in July.The attacks inflicted moderate damage on their targets, and the British lost ten aircraft. The arrival of more modern twin-engine aircraft, such as the American Douglas Boston bomber, by December 1941 allowed Bomber Command to abandon the use of Blenheim Mk IVs in the skies over occupied Europe. These aircraft and their crews had enabled the Royal Air Force to conduct offensive operations in Europe for two years of war, but they were replaced by modern aircraft capable of engaging the enemy more effectively. Of the nine Blenheim squadrons in the Middle East, only 113th Squadron in Aden had received the new Mk IVs by the time Italy entered the war on June 10, 1940. However, by the end of the year, about a hundred Blenheim Mk IVs had arrived from England, destined for the rearmament of RAF units in the Middle East. The aircraft arrived by sea at Takoradi in West Africa, where they were assembled and then flown the approximately 4,000 miles to Egypt. This route was used to avoid bomber flights over the Mediterranean, where the enemy had gained air superiority. Blenheim Mk1Vs were first used in combat in North Africa by Nos. 45 and 55 Squadrons, although there is evidence that some Blenheims remained with No. 11 Squadron in Greece until the Allied evacuation. No. 203 Squadron, based at Habbaniyah, Iraq, used Mk IVs to suppress the pro-German Rashid Ali Rebellion in April 1941 and also attacked Vichy forces in Syria until their surrender in July.The attacks inflicted moderate damage on their targets, and the British lost ten aircraft. The arrival of more modern twin-engine aircraft, such as the American Douglas Boston bomber, by December 1941 allowed Bomber Command to abandon the use of Blenheim Mk IVs in the skies over occupied Europe. These aircraft and their crews had enabled the Royal Air Force to conduct offensive operations in Europe for two years of war, but they were replaced by modern aircraft capable of engaging the enemy more effectively. Of the nine Blenheim squadrons in the Middle East, only 113th Squadron in Aden had received the new Mk IVs by the time Italy entered the war on June 10, 1940. However, by the end of the year, about a hundred Blenheim Mk IVs had arrived from England, destined for the rearmament of RAF units in the Middle East. The aircraft arrived by sea at Takoradi in West Africa, where they were assembled and then flown the approximately 4,000 miles to Egypt. This route was used to avoid bomber flights over the Mediterranean, where the enemy had gained air superiority. Blenheim Mk1Vs were first used in combat in North Africa by Nos. 45 and 55 Squadrons, although there is evidence that some Blenheims remained with No. 11 Squadron in Greece until the Allied evacuation. No. 203 Squadron, based at Habbaniyah, Iraq, used Mk IVs to suppress the pro-German Rashid Ali Rebellion in April 1941 and also attacked Vichy forces in Syria until their surrender in July.The Mk IV was used in suppressing the pro-German Rashid Ali rebellion in April 1941, and also attacked Vichy forces in Syria until their surrender in July.The Mk IV was used in suppressing the pro-German Rashid Ali rebellion in April 1941, and also attacked Vichy forces in Syria until their surrender in July.
Over the next fifteen months, Blenheim Mk IV units in North Africa provided direct support to the British 8th Army in its clashes with General Erwin Rommel's Afrika Korps. Blenheim Mk IVs also served with two other Allied units in Africa: No. 342 (Lorraine) Squadron of the Free French Air Force and No. 11 Squadron of the Royal South African Air Force. These units operated alongside the British and were subordinate to the RAF. During the North African campaign, several Blenheim squadrons from No. 2 Group were transferred from England to the Mediterranean island of Malta. Situated between Sicily and North Africa, the island was close to major enemy supply routes and provided an excellent base for Allied bombers, which were disrupting Rommel's supply lines. The Blenheims operated in conjunction with Wellingtons based in Egypt, employing tactics similar to those employed during Operation Channel Stop, and dealt a serious blow to Axis shipping. By the end of 1941, approximately 65% of Axis cargo tonnage in the region had been sunk, but the RAF paid a heavy price for these results. In three months, 107 Squadron lost at least 24 crews (out of the 26 who arrived in Malta) and all of its original officers. The Blenheim Mk IVs operating in the tropics received only one modification: the installation of Vox dust filters on the carburettor intakes, preventing sand and dust from entering the engines. Many African Blenheims had their bomb bay doors removed (sometimes only the inner pair), but the reasons for this modification remain unclear. Blenheims in North Africa were supposed to have their upper surfaces painted Dark Earth and Light Earth, and their undersides Mediterranean Blue, but until August 1941, many bombers sported European camouflage. By the end of February 1942, only a few Blenheim Mk IV squadrons remained in Africa, as after the attack on Pearl Harbor, most bomber units were urgently transferred to the Far East. The remaining squadrons gradually began to re-equip with Douglas Boston (A-20) bombers. In January 1942, two Blenheim squadrons, Nos. 84 and 211, were transferred to Sumatra in the Dutch East Indies, where their twenty aircraft reinforced the strength of No. 225 (Bomber) Group. They were also joined by a handful of surviving Blenheim Mk IVs from No. 34 Squadron, evacuated from Singapore. Operating from airfields near Palembang, the Blenheims escorted convoys, conducted reconnaissance, and carried out strikes against their former bases in Malaya. On February 15, 1942, all available bombers were thrown against the Japanese invasion fleet in Sumatra. Although many enemy ships were sunk, the British were unable to consolidate their success due to a shortage of aircraft and crews.On February 18, the Blenheims were evacuated to Java, where the surviving aircraft of 211 Squadron joined 84 Squadron. In Java, the rapidly dwindling Royal Air Force forces were used to harass the approaching Japanese invasion fleet. On March 1, a few hours after the enemy landings, the remaining aircraft of 84 Squadron were either destroyed or captured at their airfield at Kalijati in a surprise Japanese attack, ending the Blenheims' stay on this tropical island.
In April 1942, the Japanese sent a carrier strike group to the Indian Ocean to attack the important Royal Navy base at Trincomalee, Ceylon. On April 5, an armada of 124 Val dive bombers, Kate torpedo bombers, and escorting A6M Zero fighters descended on the British, sinking numerous ships. Following this raid, the Blenheim Mk IVs of No. 11 Squadron were tasked with searching for the Japanese carriers. Finally, on April 9, the Japanese force was spotted, and the squadron dispatched eleven Blenheims to attack them. Two aircraft returned with engine problems, and the remaining nine attacked the enemy, losing five aircraft to anti-aircraft and fighter fire. On April 11, the Japanese carrier strike group left the Indian Ocean – the Battle of Ceylon ended. In January 1940, Bristol proposed to the Royal Air Force the development of a ground-attack bomber based on the Blenheim Mk IV airframe, armed with bombs and a battery of four machine guns. In May 1940, the Air Ministry accepted the company's proposal and issued Specification B.6/40, calling for a tactical bomber capable of providing close air support to troops with both bombs and machine gun fire. Bristol submitted the Type 149CS design – an improved version of the Blenheim Mk IV, in which the two-man crew and vital components were protected by armor, weighing a total of 272 kg (600 lb). In addition to the standard Mk IV bomb bay, the new aircraft received four 7.69 mm machine guns in the nose, which had lost its glazing. Bristol envisioned using a low-altitude, 950-horsepower version of the Mercury engine, running on high-octane gasoline. The Air Ministry ordered two prototypes of the new aircraft (AD675 and AD661), designated the Bisley Mk 1. The Air Ministry designated Rute Securities as the Bisley's primary supplier and awarded it an order for 750 aircraft. In September 1940, the contract was amended to include both attack aircraft and bombers. The latter received the designation Type 149HA, later changed to Type 160. Two pre-production aircraft rolled off Rute's production line in September, the first of which, DJ702, was transferred to Bristol for testing. Official tests showed that the Bisley Mk I could reach a maximum speed of 423 km/h (260 mph) at sea level with a maximum weight of 7,711 kg (16,500 lb). However, these results cannot be considered reliable – the prototypes were equipped with Mercury XVI engines producing 920 hp, while the production aircraft used Mercury XXV or XXX engines producing 840 hp. Given the increased weight of the Bisley, its performance characteristics were bound to deteriorate. Serial production of the aircraft began in October 1941, and in November the Air Ministry abandoned the Bisley name in favor of Blenheim Mk V, believing that different designations for very similar aircraft could lead to confusion. Although the revised contract called for 1,195 aircraft,Only 942 aircraft were actually produced, the last of which left the Rute factory at Blythe Bridge, Staffordshire, in June 1943.
At the height of the invasion of North Africa, in November 1942, four squadrons of the 236th Bombardment Wing were selected to convert to the Blenheim Mk V: the 13th, 18th, 114th, and 614th. Their personnel were unlikely to be pleased with this decision, as their counterparts in other units were trading in their Blenheim Mk IVs for Bostons or Mosquitoes. In November 1942, these squadrons deployed to Camrobert Airfield in Algeria, approximately 320 km from their primary targets in Bizerte, Tunisia. The units were soon redeployed to forward airfields to reduce the risk of long flights without fighter escort. On November 17, 1942, No. 18 Squadron, flying a close air support mission, ceased to exist as a combat unit when it was intercepted by Bf 109s from JG 2. Within five minutes, the German fighters shot down all twelve of the squadron's bombers, one after another, the last of which was the aircraft of the squadron's commander, Wing Commander Hugh Malcolm. For this mission, he was posthumously awarded the Victoria Cross. The Blenheim squadrons were actively used in support of troops, bombing enemy concentrations, airfields, and lines of communication until the end of hostilities in May 1943. Nos. 13 and 614 Squadrons used Blenheim Mk Vs until the end of the desert fighting, and the reconstituted Nos. 18 and 114 Squadrons re-equipped with Bostons. No. 13 Squadron used Blenheim Mk Vs to patrol the Tunisian coast until late 1943, when it received Lockheed Venture patrol bombers. No. 614 Squadron, transferred to Sicily, flew the Mk V until its disbandment in February 1944. In addition to units of No. 236 Wing, No. 201 Group received numerous Blenheim Mk Vs as reinforcements in mid-1942. These aircraft were assigned to various units, including the Free French Air Force, Greek, and South African squadrons. Their missions included coastal patrol, troop support, and rail interdiction. No. 15 Squadron of the South African Air Force, part of the anti-submarine wing, operated alongside Beaufort and Beaufighter units. During the final phase of the African campaign, the wing was redirected to interdicting German sea lanes, with a particular focus on destroying tankers. On October 26, 1942, the tanker Proserpina was fatally damaged as it was about to reach the safe harbor of Tobruk. The first bombs to hit the vessel belonged to a Blenheim Mk V. Unfortunately, its wingman struck the vessel's mast and crashed into the water. Two more Blenheims collided in mid-air while returning to base.
Two more Blenheim squadrons, Nos. 8 and 244, operated in the Middle East, based in Aden on the Red Sea. From 1942 to 1943, they were primarily engaged in anti-submarine patrols and anti-shipping missions. In the Far East, four squadrons of No. 211 Group, based first in India and then in Burma, were armed with Blenheim Mk Vs and actively engaged in combat against the Japanese. However, by late 1943, they were equipped with more modern aircraft.
In the UK, a number of Blenheim Mk Vs were used by meteorological and training units until July 1945, although most aircraft of this type were withdrawn from service by mid-1944, ending their bomber service with the RAF.
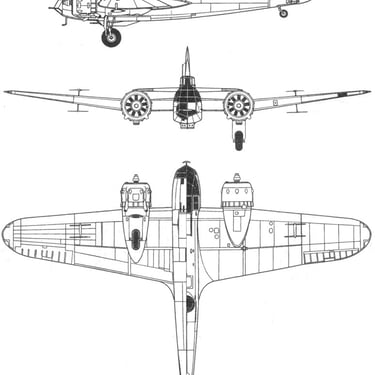
Technical description of the Blenheim Mk.I aircraft.
Type: Twin-engine, high-speed medium bomber.
Wing: Mid-wing. Three-section wing. The center section is attached to the fuselage with bolts and rivets. The outer wings are thin, trapezoidal. The spars consist of a pair of heavy strips of highly elastic steel and light single-sheet aluminum alloy (anodized aluminum) webs between them. The webs are reinforced with vertical ribs. The ribs are made of aluminum alloy sheets with curved edges and with holes for lightweight construction. The aluminum alloy working skin was riveted to the bends of the spar and ribs. Balanced ailerons of the Bristol Freeze type and split flaps along the trailing edge. The flaps are metal, the ailerons are of metal construction with fabric covering. Small trim tabs on the ailerons were adjustable on the ground.
Fuselage: Three-section light-alloy monocoque. The alclad skin was riveted to the bends of the stringers.
Empennage: Monoplane. The tail and stabilizer are all-metal, like the wing. The elevator and rudder are of metal construction with fabric covering. The stabilizer is fixed with a strip for the correct installation of the front and rear sections. A controlled trim tab is on the rudder. All control surfaces are aerodynamically and statically balanced.
Landing gear: Retractable. Each retracts rearward using a Bristol-type hydraulic connector (breakable hinged knee). A hand pump is provided for emergency situations. A warning system for the extension and retraction of the landing gear, including light, sound and mechanical indicators. Wheels with average tire pressure. Separate pneumatic brakes.
Powerplant: Two Bristol Mercury VIII radial nine-cylinder air-cooled engines, 840 hp each. The engines were mounted in steel nacelles on a standard Bristol split duralumin mounting ring, allowing for quick engine removal without disturbing the carburetors. Three-bladed variable-pitch propellers were used. Two 863-liter fuel tanks were housed in the center section, while two 43-liter oil tanks were located in the engine nacelles. Electric and manual starters were available.
Interior layout: The pilot's seat was on the left side of the nose cockpit, with the navigator's station located nearby. The navigator used a folding seat in front for aiming. Dual controls could have been installed. The glazing consisted of fixed and sliding window panels and a transparent sliding ceiling. The central fuselage section contained an internal bomb bay with spring-operated hatch doors. The rear turret was located behind the wing, centered on the upper fuselage. The crew included a pilot, navigator-bombardier, and radio operator-gunner.
Armament:One forward-firing 7.7mm Browning machine gun in the left wing and one 7.7mm Vickers K machine gun in a hydraulically powered, semi-retractable Bristol turret. 454 kg (1,000 lb) of bombs were carried in the fuselage bomb bay. A built-in manual bomb-retrieval winch was operated from outside the fuselage.
Other equipment: Lighting, radio, photo, and navigation equipment. Oxygen apparatus. Boxes for parachutes, uniforms, etc.